How To Make Free WordPress Website – Buy Free Web Hosting And Free Domain Name
So we have already discussed how to create a Blog, Install A WordPress Theme, How to install Plugins, but we thinking that something is missing, Yes! How To Make Free WordPress Website right? In this article, we will tell you how to buy free web hosting And Free Domain Name.
Usually, website owners do a lot of mistakes in buying hosting from unreliable companies, and they regret this misstep later. Let’s explore this knowledge step by step in order to get the free WordPress website.
What is Web Hosting?
A web host is a place or area where you keep all your website files. The files contain audio, video, image, text etc. Now the question is from where you get this web hosting? From the web hosting companies always have to keep their servers up to make sure that your site is live.
Or A web hosting service that allows individuals and organizations to make their website accessible via the World Wide Web.
READ MORE: 5 Best Websites For WordPress Themes In 2018
Now, start how to make Free WordPress Website:
I recommend to go with Bluehost. Though, many companies provide some offers. Bluehost is dedicated to providing industry-leading support and reliability, Bluehost offers free SSL certificate which is must-have & also you have an option to upgrade to PHP 7.0.
As a bonus, with Bluehost, you will get one free domain name. Don’t you think that this will save your lot of money right? And also you can manage everything in one place.
Bluehost Features:

- Easy WordPress Installation.
- 24/7 Customer Care Support.
- Unmetered Bandwidth and Space.
- Unlimited Website Hosting.
- 30 Days Money Back Guarantee.
A few things you should know:
Domain Name: Domain Name is an online address or identification where internet users access your website by this unique address.
Payment Mode:
Once you find your domain name, the next step is payment. You can make payment via credit card, debit card, or PayPal.
Now Let’s have an eye on step by step guide to buy web hosting plan-
There nothing to worry about. All you need to visit the official website of Bluehost and click on “Get started now”.
By clicking on “Get started now” you will see a page with three different packages from which to choose. Before moving on the next step give your time in reading and understand various packages, Go deeper and understand what these packages offer.
So, the three plans are Basic, Plus and Prime. If you are running only one site, go with the Basic Plan, If you are running more than one site, go with the, Plus plan, In case you want to take prime plan, this is a good choice. As it offers domain privacy, spam experts and site backup. Moreover, you can host more than 1 site. Cool! Right?
Price Chart:
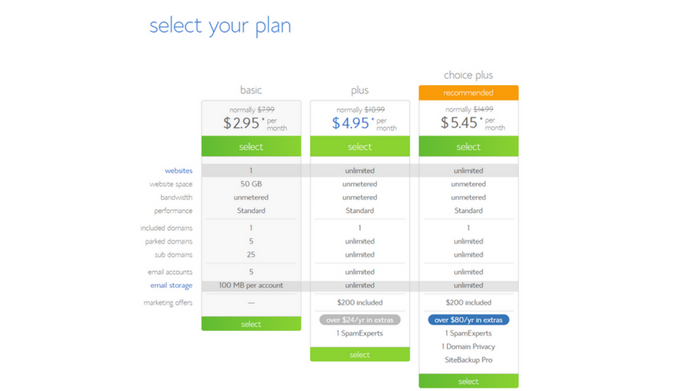
- Basic- $ 2.95 per month
- Plus- $ 4.95 per month
- Prime- $ 5.45 per month
Note* You can host unlimited sites with Prime plan.
Step 1. Domain Selection
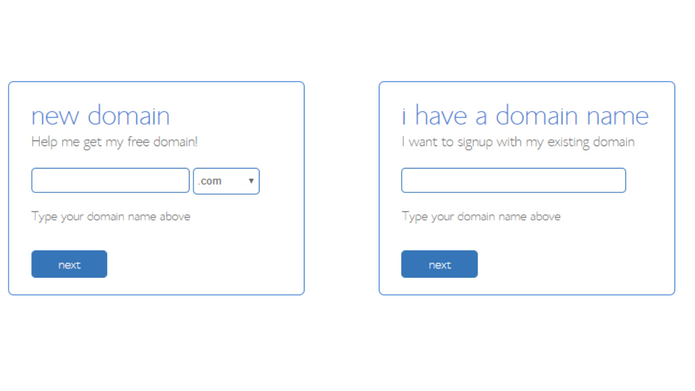
Here you have two option, you can choose the new free domain or go with the existing one(Any of your existing domain names). Also, If you don’t want to use your free domain right now, you can use it later.
Moreover, You can also claim your free domain at a later point. All you need to frame an email and send to Bluehost’s customer service team and they’ll help you out.
Another option is Using existing domain. With this, you need to change the nameservers at your domain registrar to:
- NS1.Bluehost.com
- NS2.Bluehost.com
Step 2. Enter your account details
Give all relevant account details, Here you need to enter your details (name, email address, address, etc.).
Once you finish it, Check each and every field and make sure you verify every detail, especially your email address. It is because your login and hosting information will be sent to your email address.
READ MORE: Create A Private WordPress Blog or A Private Post
Step 3. Package Selection
Package selection is a point, where you need to pay extra attention. Check the complete details and make sure that you are not overcharged for add-ons that you do not need.
Furthermore, I recommended choosing the hosting plan for a long time. As in general, when we look for an item on rent its price decreases according to an increase in tenure.
Similarly, Choose your hosting package for a 24 or 36-month term. Meanwhile, You will notice that the price decreases as the tenure increases.
Also, if you do not want the extra services like “Site Backup Pro” and “Sitelock Security” just deselect them.
Step 4. Payment Mode
It’s time to pay so before you make your payment, check all the information that you entered is correct or not. After checking all the information you find the option to make payment via credit card only, which is set by default. But you can choose more options like PayPal click on “more payment options”.
Finally, on completing the payment mode you will see a confirmation of your hosting package purchase. Now Click on “create your password”.
Step 5. Select a password
You are almost done! Here I suggest making a strong password. For making a strong and complex password you can also go with a password generator to create a complex password.
Step 6. Log into cPanel
Hurrah! You have successfully purchased your web hosting and domain, just check your email that contains all information regarding login for your web hosting account.
Good Luck! 


