


")


")


How to use MailChimp for email marketing for beginners
“Email marketing” the term usually refers to send email for building a relationship between merchants and customers also meant to build loyalty, trust. These emails consist of advertisements, business request, or solicit sales or donations to enhance their brand value or business. In this article, we will learn how to use MailChimp for email marketing for the beginners.
MailChimp provides email marketing and autoresponder software to small and large businesses worldwide by making campaigns. MailChimp also provides the tracking system to email campaigns, the user can easily track the performance of their email campaigns.
I landed with MailChimp because it’s one of the highly recommended services, easy and free to use. You can send up to 12000 Emails using MailChimp and first 2000 subscribers for free. You will not be charged anything until you have crossed their free limit which is useful for bloggers who are worried about paid email marketing.
Moreover, MailChimp keeps adding new features to their design, templates, and looks, which will be helpful for your Email marketing campaign.
1Account Setup
First of all, you need to create an account at MailChimp. Once you have created and logged into MailChimp dashboard you are ready to use the MailChimp.
2Create Subscribers List and Signup Forms
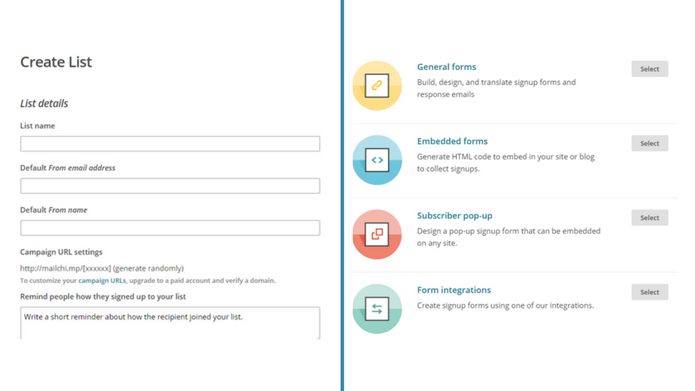
Now, go to the list and create a new list for your subscribers. It is possible to create multiple lists; suppose you want to create a list solely for clients and another solely for blog readers you can make two lists and next, fill in the details for your list. This is as simple as filling a form or signup for Gmail. So you need to include your name or your business name, as well as an email address where they can contact you.
After you “save” your list, you’ll be taken to your list’s dashboard where you can view a list of your subscribers, design your signup forms, and more. Now you need to click “Lists” and then the name of the list you want to edit, which will also take you to your selected list’s dashboard.
Click “Signup Forms” and then “General Forms”. Now, you can customize and design your form by simply scroll down or drag and drop. You can also change colors, fonts, images and add and remove fields to your liking.
Lastly, make sure to take note of the URL for your signup form to encourage people to sign up for your list. This is the URL you can use on social media, your blog, etc.
3Import Subscribers to a List

If your MailChimp list already has subscribers contacts that’s good but when you need to add more people to the same list what we do? MailChimp provides auto-update import feature, Which can help in adding new people to list and update the information of current subscribers at the same time.
First, all you need to prepare your spreadsheet file of contacts outside of MailChimp and save it as a CSV file. For preparing spreadsheet you need to go to the following point –
- Paste your email addresses into a spreadsheet.
- Save your spreadsheet as a CSV file.
Now, go to your list dashboard and select import by CSV file then upload your file. You’re all set to import.
4Now it’s time to create and send your first newsletter
Let’s move to “Campaigns” at the top. Then click on “Create Campaigns” button. You’ll need to select which list to send it to and then click “Next” at the bottom. Here you can name your campaign, include an interesting subject line.
You have to focus on your subject which is a very important part, the subject line should be finished within 150 words and have a specific and genuine line otherwise your mail will consider as a spam and go to spam box of Gmail. MailChimp itself provides you a proper guideline how to make your subject line.
Emoji characters are well supported in many email clients (especially on mobile) but they don’t show up everywhere. Make sure your message is conveyed without them.
For example, avoid replacing words like this:
50% off all ![]() and
and ![]()
Instead, you could do something like this:
![]() 50% off all Women’s Tops
50% off all Women’s Tops ![]()
Now, you can select a template, which is the general layout you want your newsletter to be in. According to your newsletter, you can select a template that works best for those things it’s really up to you. For sharing links to blog posts, you may want to include a template that allows you to add small images with a short description. After selecting a template, you can begin adding elements and content to it. The image at the top is a great place to add your logo.
Once you’ve created a beautiful template, I highly recommend clicking “Save as Template”. So, you don’t need to create a new one every time you send out a campaign. Finally, you’re all finished with your newsletter or “campaign as Mailchimp calls it, then click “Next”. Give two minutes time to your whole design and content to check and verify that everything looks correct and there are no errors. If you’re ready, you can hit “send,” which will send it out immediately. It’s a good thing that you can also schedule it for a date and time in the future.
Good Luck!  If you liked this article, then please subscribe to our YouTube Channel. You can also search for the latest tech news and follow us on Twitter, Facebook, and LinkedIn.


")


