


")


")


How To Use SMTP Server To Send WordPress Emails-Tutorial
Hey! did you face problem in configuring WordPress for sending emails via SMTP? Let’s see How To Use SMTP Server To Send WordPress Emails.
Sometimes, we see that the mail function of PHP doesn’t work due to the wrong configuration or disabled by the hosting provider. so in that case, your WordPress emails will not be delivered.
Don’t worry, You not need to spend money on third-party email services such as Mailgun, Google Apps for work, or Sendgrid. If you use any of these services you will have to pay for your account, and the cost will vary depending on how many users/accounts you add or the number of emails you send. let’s move together to understand the problem and fix the issue.
Note* WordPress SMTP plugin: WordPress has several SMTP plugins you can use.
What Problem Arises with WordPress Emails
By default, WordPress uses the PHP Mail function to send its emails. So, what happens with this? Many shared hosting providers do not have this function configured properly, or it is seen that they have disabled it entirely to avoid abuse. As a result, your WordPress emails to not be delivered.
Now, you might be thinking to recover this problem, well one solution is to use a third party (Mailgun, Google Apps for work, or Sendgrid)email service to send out your emails. For this, you have to pay. But, what if we told you that there is another option, and most likely you are already paying for it?
READ MORE: Best 5 WordPress Plugins To Get More Email Subscribers
1Email Accounts by Your Host
This is very simple, You can directly(an email account in cPanel) create an email account with your own domain name like yourname@yoursite.com. As Most WordPress hosting providers offer email services for each domain you host with them.
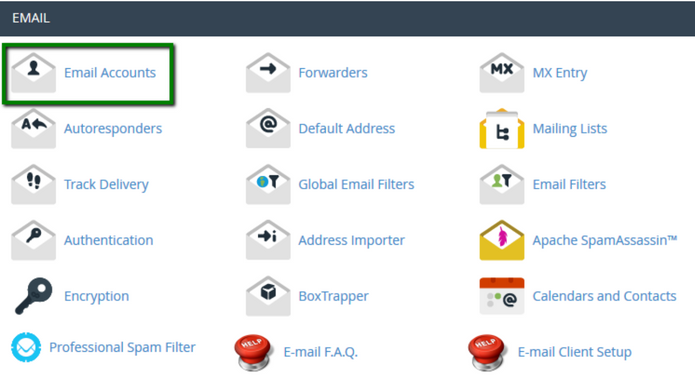
All you need to create an email account in cPanel. Let’s start, log into your hosting account, and click on email accounts under the mail section.
This will let you fill out information on a simple form which is required to create your email account.
So, here we are making an account to send WordPress emails, we recommend that you create an email account like wordpress@domainname.com.

At this point, you are now ready to use it in WordPress. But before you do that, you will need the following information from your hosting service provider.
- SMTP Host for your email address.
- SMTP Port for secure login.
For this, you can check the support section on your host’s website. So, when you find it, then you should contact the hosting support to request this information.
2Use Email Address in WordPress
Once you have done with the information from your hosting service provider, all you need to install and activate the WP Mail SMTP plugin.
After activating the plugin go to Settings » Email to configure the plugin settings. Now, enter the email address which you created, Then add a from the name, this will be used as the sender name.
But, In case you forget to add the form name or not add it then the plugin will use the default WordPress.
Next Step is to choose the mailer. Then click on the ‘Other SMTP’ option to select it.

Also, Don’t leave the return path unchecked If you leave it unchecked, bounced messages and non-delivery receipts will be lost.
Finally, set up SMTP options.

Here, You see SMTP host where you have to enter your SMTP host and port. For this get this information from your hosting provider.
Generally, SMTP host is mail.yourdomain.com all you need to replace yourdomain.com with your own domain name.
Now, For SMTP Port 465 is commonly used.
After all these next is encryption, Let’s choose encryption.
Note* WordPress hosting companies support Both SSL and TLS. We recommend you to go with TLS option.
Next, Click On the authentication toggle and give your SMTP username and password. Usually, the email address is your SMTP username.
Your password is stored as plain text, which is not safe. So make it more secure. And Don’t forget to save settings.
3Testing Your SMTP Settings
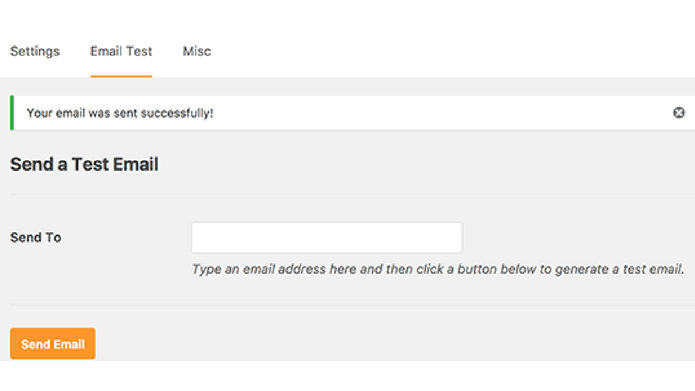
Now Its time to test your SMTP settings, that you have set up WP Mail SMTP to send emails. Check, It is working or not. On the plugin’s settings page, click on the ‘Email Test’.
Here, All you need to give an email address where you would like to receive the test email. And Finally, click on the Send Email to continue.
This Will send an email message using the SMTP settings you entered earlier. Meanwhile, You will see a success message when email is successfully sent.
4Secure Email Password
The Password in WP MAIL SMTP settings, Which normally stored as plain text means unsafe. So, what you need to do? Try to make it more secure, Also the plugin provides you with an option to make it more secure.
It is very simple and you need to work on it, For this, you need to add some code to your wp-config.php file.
Follow the below steps for this:
- Connect to Your website using an FTP client or File Manager app in cPanel.
- Open the root folder of your website.
- Find your wp-config.php file in the.
In the wp-config.php file all you need to add few lines of code, for that you can use any plain text editor like Notepad or TextEdit.
Place the code before the lines that say ‘That’s all, stop editing! Happy blogging’.
|
1
2
|
define( 'WPMS_ON', true );define( 'WPMS_SMTP_PASS', 'your_password' ); |
Note* Don’t forget to replace ‘your_password’ with your actual SMTP password. And Finally, save and upload your wp-config.php file back to the server.
Generally, People did this mistake because of incorrect SMTP host or port. Make sure that you are entering the correct host and port settings provided by your hosting provider. Also, Check for correct encryption method.
Good luck!  If you liked this article, then please subscribe to our YouTube Channel. You can also search for the latest tech news and follow us on Twitter, Facebook, and LinkedIn.
READ MORE: How to enable GZIP compression for your WordPress site


")


